Build your own electronic drum kit
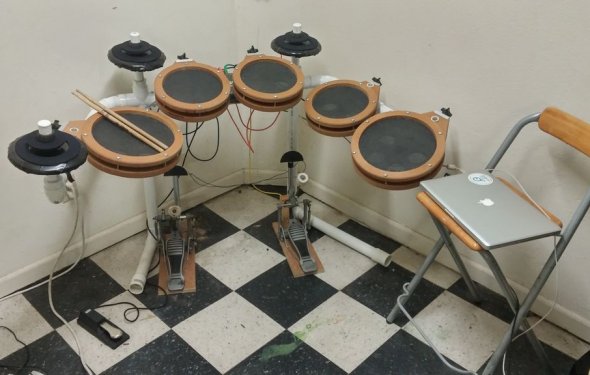
A full-sized homemade electronic drum kit.
Why?
I am excited by the endless sounds available through electronic sampling. I’ve already been using keyboard-based MIDI controllers & an electronic hand-drum (Roland Handsonic) for many years. I wanted to expand my palate to include full-sized pads that I can hit with drumsticks, to augment the acoustic drums that I play with my band Battlehooch. Additionally, I'm employed as an accompanist for modern dance classes, so this would add to the laptop-piano-iPad-MIDI keyboard combo I currently use to compose music in real-time.
Approach:
This first iteration is roughly modeled after the Roland V-drum. The main features I extracted were:
1. Piezoelectric pressure sensors for velocity-sensitive note triggering.
2. Mesh drum heads for quiet, responsive hits.
3. Dual-zone pads in which two sensors are connected to each jack. This allows for triggering two separate notes over a single cable. Usually the hits are divided as snare & rim, or cymbal & bells. This kit also features double kick pedals that transmit over a single TRS cable.
4. A drum brain that converts analog signals from the piezos into MIDI messages that a computer can recognize. Software then interprets the messages to generate musical output. In this case, I am using an Alesis Trigger I/O, which feeds into my laptop via USB.
5. Typical drum kit form-factor. Based on the number of inputs on the Trigger I/O, my kit features three dual-zone cymbals, two kick pedals, one hi-hat pedal & five dual-zone drum pads. A total of nineteen independent notes.
Discussion:
I wanted to make a drum set controller that would have the same functionality as a professional kit, but at a fraction of the price. I also wanted to have control over the look and feel of the kit, as well as add more triggers than are typically offered. After much trial-and-error, I can say that I was successful in these goals. The main cost was the drum module. It’s also one aspect that’s not fully DIY. After looking at several options for custom microcontrollers, including Arduino & PCB-based solutions, I decided on the Alesis Trigger I/O simply because it’s an eloquent & affordable solution to a tricky electronics problem. I knew that building the kit itself would be a long process, so it made sense to go with a market-proven solution for the analog-MIDI-USB communication. All the other parts either came from Ebay, various hardware stores (Lowes turned out to be most helpful), or salvaged from my own workstation & my dad’s garage. My father turned out to be an immense help, offering his sage advice and expertise on materials, methods and tools. Most of the creative problem-solving was a joint effort between the two of us. It was quite a thrill to have all the pads work successfully on my first try playing a drum rack in Ableton Live. (To be fair, there was plenty of troubleshooting to get each pad working individually before trying them all together!) There are, however, some crucial areas that leave room for improvement. A fundamental goal of the project was to be able to transport the controller to live performances. However, my kit turned out to be quite fragile in several places. The TRS jacks are not as reliable as I’d like. Sometimes they fail to make the proper connection with the separate TRS cable sleeves. The cymbals feel less than solid. The kick pedal beater pads tend to loosen over time. I’ve also not figured out a way to safely transport the kit. The rack is clunky when disassembled, & each component has to be tediously removed. There are lots of cables to account for & reassembly is a chore. That being said, it's still a great instrument and I'm especially proud of the pads. They're much nicer than the plastic ones that come on most consumer kits.
What's Next?
For the reasons mentioned above, I am currently building a new, more compact version of the kit. It will have roughly the same number of triggers & large enough pads to play with drum sticks. However, the shape will be a single large rectangle containing 20 pads, arranged into four terraced rows of five pads each. All the wires & the brain module will be housed within the unit. The pads will be a sandwich of wood, metal & neoprene. Assembly and disassembly will be much simpler: just attach the pad to a stand, & connect to the computer. It won’t look as cool or have the same intuitive playability as the full kit, but will be much more portable. Look forward to a second Instructable outlining this project, coming soon! Further in the future, I would like to figure out how to add positional sensing to the pads, for additional X-Y control dimensions.